


One of the questions I am often asked is how to speed up the time it takes Windows to load or boot. There are a variety of factors (both hardware and software) involved in lowering the amount of time it takes for Windows to load. I will go over most of these ways in this page starting with changes in the system BIOS and moving onward from there.
All of these changes are optional, and do not need to be carried out. Instead, they are offered as suggestions to try to lower the time it takes for Windows to boot. Some of these changes are very advanced and should only be attempted if you are comfortable with making the changes and have your data backed up.
System BIOS Changes
One of the first places to help speed boot time in Windows is to make some simple changes to the system BIOS. The BIOS or Basic Input/Output System is a set of instructions and commands built into the motherboard that allows the computer to know what type of hardware is connected and how to communicate with that hardware. You'll first have to gain access to the BIOS setup screen to make any changes. Do not make changes to the system settings in the BIOS lightly, one mistake can render the computer unbootable and cause more problems than its worth. For this reason, do not attempt making changes to the system BIOS unless you are willing to accept the risk along with it. With that said, you'll want to follow the directions below and make some simple changes to speed up the boot process.
1) You must start with the computer completely off, not in sleep or hibernation mode. Then turn the computer on.
2) Enter the system BIOS screen by the manufacturers suggestion. Depending on the computer, this may involve pressing the DEL key, pressing F1, Pressing F10, holding down CTRL-ALT-S, or a variety of other keystrokes to get to the BIOS screen. For a more complete list of keystrokes to enter the BIOS screen, visit Michael Steven's page on the subject.
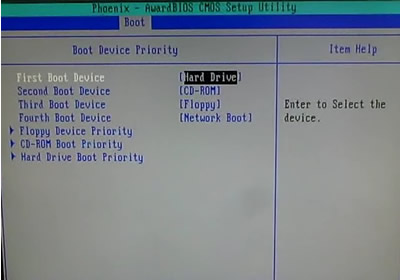
3) Once in the BIOS setup, look for a BOOT menu and select it with your keyboard arrow keys, Tab, and Enter.
4) In most modern BIOS screens, you'll find an option for Quick Boot. Enable this to skip memory tests and other minor Power On Self Tests (POST).

5) Find an option for Boot Device Priority next, and change the first boot device to be the hard drive. Changing this option will speed up the boot process, but it will also not allow the computer to boot from a floppy disk or CD-ROM. If booting from anything other than the hard drive is important to you, please skip this step. If later on, you need to boot from a CD-ROM, simply re-enter the BIOS setup and make the CD-ROM the first boot device.
6) Choose the option to Exit and Save Changes and the computer will reboot.
There are other options in the BIOS to speed up boot time such as choosing the exact settings for your hard drive, and disabling AUTO DETECT of hard drives and other media. However I am skipping those changes and leaving them for a later discussion.
Changes to Windows Settings
The next group of changes to consider will be to the many Windows settings. We will use a handy tool called the System Configuration Utility to accomplish most of these changes. Follow the steps below to open and use this tool.
Startup Tab Changes
1) Click on Start, Run and type MSCONFIG and press Enter
2) Click on the STARTUP tab in the System Configuration Utility to view all the items that begin on Startup. An example is shown below.
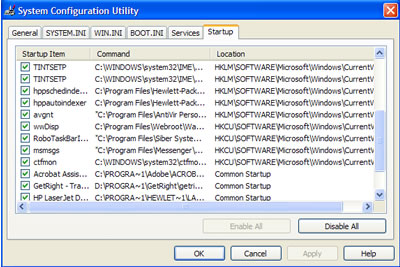
Each item on the Startup tab that is checked loads immediately after Windows starts. If there are lots of items here, this will slow down the boot time for Windows considerably. Each of these items can be toggled on or off simply by using the checkmark box to the left of the item.
The column directly to right of the checkmark is the Name of the program, while the next column over is the location on the hard drive or other device of the file. Finally the last column shows where in the computer the file is started from. This location could be in the registry as is the case with all the locations that begin with HKLM or HKCU, or it could be in the Windows Startup folder found under ALL PROGRAMS in Windows XP.
You can examine each of these startup items and uncheck any that are not necessary. How do you know which ones are not necessary? Well, in most computer configurations, you'll want drivers running for your graphics or video controller and sound card, and most likely an antivirus and firewall running. Other startup items are usually extras that could be eliminated from boot up. To discover what a particular item is used for, jot down the name for the item and go over to a site called Process Library, type in the name of the process and click Find. This is a very handy tool for discovering which startup items are truly needed.
When you are done modifying the checkmarks to the Startup tab, click OK and you'll be asked to reboot the system.
Windows Services Changes
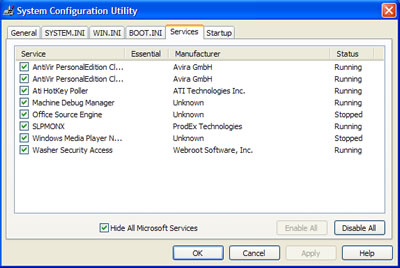
Once the computer is rebooted, click on Start, Run and type MSCONFIG and press Enter again. This will reopen the System Configuration Utility. Click on the Services tab, then click on the option at the bottom called "Hide All Microsoft Services" to see what unnecessary Windows services are running that can be removed. Generally speaking, you want services related to your video/sound cards and antivirus or firewall programs left running. Other services may not be essential and can be removed. Remember to only remove unessential services or you risk experiencing boot problems. Use Google to search for information on unfamiliar services. Another good resource is Black Viper's Strange Services page.
Hardware Changes to Increase Boot Time
Adding more Memory (RAM)
Other than upgrading the motherboard and CPU, you can generally increase the amount of RAM in your computer to make it load programs and applications faster and provide a more enjoyable computing experience. You'll want to check your motherboard to make sure you have available slots and the maximum amount of RAM you can add to your particular motherboard.
Replacing your Hard Drive with a Faster RPM Drive
If you have a slower hard drive such as a 5400 RPM or slower, you may want to consider upgrading to a faster 7200 RPM
hard drive. The difference in RPM speed will generally be quite noticeable.
Changing to Static IP
If your computer is connected to a local area network that you control and you have a DHCP server enabled on your router, during the boot process the computer queries the network for a valid IP address. You can shave seconds off your boot time by assigning a valid IP address to your computer instead of using DHCP to assign it. To setup a Static IP for your computer, follow these directions.
1) Click on Start, Run
2) Type NCPA.CPL and press Enter to open the Network Connection Control Panel
3) Right-click on the Local Area Connection and choose Properties
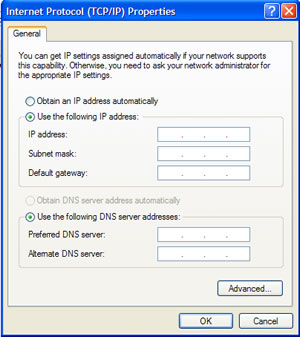
4) Click on Internet Protocol (TCP/IP) and click Properties
5) You should see a screen similar to the one below. Fill in your static IP, subnet, default gateway, and DNS server information and click OK. If you aren't sure of your IP ranges on your router, consult your router manual or a friend that is more knowledgeable in networkingterminology. Again, this is an optional item and does not necessarily need to be accomplished. Using DHCP is fine, although you sacrifice a few seconds for an IP to be assigned to from the network.
Switching from Master/Slave to Cable Select
In a recent article, I talk about how changing the configuration on the hard drive from Master to Cable Select reduced the boot time on this particular machine by 2 minutes.
Other Windows Performance Tips
Reduce the Number of Fonts installed
Every font that is installed in Windows has to load when Windows starts. The more fonts you have installed, the slower Windows loads. Although you can safely have around 1000 fonts loaded in Windows, I like to keep my font list closer to 300-500 or fewer if possible. There are certain fonts that are definitely required by Windows, so be careful in removing any fonts from your computer unless you know they are not needed. Fonts such as Verdana,Arial,Trebuchet, Tahoma, Tahoma, Times New Roman, MS Sans Serif, and Courier New should be left on your system. Follow the directions below to remove extra fonts from Windows XP.
1) Open My Computer
2) Double-click on Drive C
3) Click on File, New Folder and title it Fonts Backup
4) Double-click on the Windows folder to open it
5) Double-click on the Fonts folder
6) Highlight the fonts you wish to remove, click on Edit and choose COPY
7) Navigate back to the C:\Fonts Backup folder and PASTE these fonts into your backup folder
8) Return to the Fonts Folder and right-click on any fonts you previously copied to the backup folder, then choose Delete.
If you accidentally removed a font, simply reverse the procedure by copying and pasting the font back into the Windows\Fonts folder.
Disk Cleanup, Scandisk, and Defrag
Performing regular hard drive maintenance on your computer every few months will not only catch problems before they cause serious damage but also make your hard drive run at its optimal level. Follow these instructions to clean up the drive and defrag it.
1) Open My Computer
2) Right-click on the hard drive usually Drive C
3) Click on the Tools tab
4) Under Error Checking, click on Check Now. Optionally, you may want to check the boxes to "Automatically Fix File Errors" and "Scan For and Attempt Recovery for Bad Sectors"
5) Next, click on the General tab and click on Disk Cleanup. After the computer calculates the amount of files to remove, place a checkmark next to the type of files you wish to remove and click Ok. Read the descriptions for each type of file to determine if you should delete it.
6) Finally, click on the Tools tab again and under Defragmentation click Defragment Now
7) Click on the hard drive you wish to defrag, click on Analyze and then click on Defragment. This process may take some time to complete.
Virus/Spyware Scans
Finally, you'll want to complete a thorough virus and spyware scan of your system. I recommend running an online virus scan first, then a check for spyware. You can click on the following links to check your system for viruses.
Online Virus Checkers
Trend Micro Housecall - will scan and remove threats
BitDefender Scan Online - will scan and remove threats
ESet (NOD32) Online Scanner
Kaspersky Online Scan - will scan and remove threats
Panda Activescan - appears to only scan for but not remove threats
McAfee FreeScan - appears to only scan for but not remove threats
eTrust Antivirus Web Scanner - will scan and remove threats
Symantec Security Check - will scan and remove threats
Dr.Web Online Check - user can upload and test for threats on particular files
Trojan Scanner
TrojanScan by WindowsSecurity.com
Spyware Scanners
Malwarebytes AntiMalware
Super AntiSpyware
Spybot Search and Destroy
Using a Different Antivirus, Firewall, or AntiSpyware Program
If your computer is still running slow after changing and checking all of these options, it might be time to use a different program for antivirus, firewall, or antispyware security. A blog on the net called The PC Spy has a graph displaying the boot delay time from most of the popular products on the market including Symantec, McAfee, Trend Micro, ZoneAlarm, and more.
Not surprisingly, Symantec's Internet Security products top the list with a 40+ % boot delay, followed by Panda Antivirus, and Zone Alarm. So, while these products may help prevent infections and attacks, they also are contributing greatly to the slowdown your computer is experiencing. Avast, AVG, NOD32, and others perform much better according to this chart.
Tips or Myths
There are other miscellanous tips on the web that may help speed up the Windows boot time, but there are also some very controversial ones.
Emptying the Windows Prefetch Folder
The Prefetch folder found at C:\WINDOWS\PREFETCH is often a source of controversy concerning its effect on boot time. This folder preloads some applications to enable faster opening of the most used programs. There are tips on the web that point to changing a registry value or emptying the prefetch folder will improve boot time. From my experience, deleting the contents of the prefetch folder DOES NOT improve boot time and only slows the time required to open programs. There is a limit to how many items will be loaded into the folder so it doesn't get overloaded, so why would anyone empty this folder when its purpose is to speed up loading of applications. You can read more about the Prefetch Myth on XP Myths.
Disable the Windows Boot Logo
Many sites recommend disabling the animated Windows boot logo to help speed up the time it takes to boot. Although it may decrease the time by a couple seconds, the anxiety caused by facing a blank screen and wondering if Windows has stalled or froze during bootup outweighs the second or two you may save. Although if you wish to disable the Windows boot logo, follow these steps:
1) Click on Start, Run and type MSCONFIG and press Enter
2) Click on the BOOT.INI tab
3) Click the NOGUIBOOT checkbox and click OK
4) Reboot the computer
Using BootVis
When Windows XP first came out, Microsoft had a utility called BootVis, which was a performance tracing tool that Microsoft developed from software developers and system designers. It was used to identify performance issues while developing new PC products, but is no longer distributed. Microsoft states on their web page for BootVis
"Please note that Bootvis.exe is not a tool that will improve boot/resume performance for end users. Contrary to some published reports, Bootvis.exe cannot reduce or alter a system's bootor resume performance. The boot optimization routines invoked by Bootvis.exe are built into Windows XP. These routines run automatically at pre-determined times as part of the normal operation of the operating system."
I personally have tried Bootvis and saw a couple seconds improvement on overall boot time, but nothing extreme in lowering overall bootup speed.
Conclusion
Although I tried to include as much information as possible in this article, I have intentionally left some tips, hacks, and changes out. The basic steps in this article should improve your system boot up time considerably which in turn should give you a happier computing experience.


0 comments:
Post a Comment